JavaScript 메서드 등. 10개의 블로그 게시물에서 초급에서 고급까지의 9부 JavaScript 과정
게시 됨: 2021-11-09이것은 초급에서 고급으로 안내하는 JavaScript 블로그 게시물 시리즈의 9부입니다. 이번에는 JavaScript 메소드, 기본 매개변수 값, JavaScript의 Date 객체, 화살표 함수 등의 주제를 살펴보겠습니다. 이 시리즈가 끝나면 JavaScript로 코딩을 시작하기 위해 알아야 할 모든 기본 사항을 알게 될 것입니다. JavaScript 객체에 대한 이전 블로그 게시물을 읽지 않았다면 여기에서 읽을 수 있습니다. 더 이상 고민하지 않고 아홉 번째 자습서를 시작하겠습니다.
JavaScript 메소드 등 – 목차:
- 기본 매개변수 값
- JavaScript의 Date 객체
- Map() 메서드
- Filter() 메서드
- 화살표 기능
지금까지 우리는 JavaScript에서 많은 개념과 주제를 보았지만 아직 발견하지 못한 일반적으로 사용되는 것들이 있습니다. 이 튜토리얼에서 우리는 그것들이 무엇인지 볼 것입니다. 첫 번째는 JavaScript의 기본 매개변수 값입니다.
기본 매개변수 값
함수는 프로그래밍에서 매우 일반적으로 사용되며, 자주 사용되는 경우 JavaScript 기능을 활용하는 React와 같은 프레임워크뿐만 아니라 JavaScript 기능을 더 많이 활용하기 위해 개발된 추가 최적화가 있습니다. 함수에 있는 주요 기능 중 하나는 기본 매개변수 값입니다. 기본 매개변수를 사용하면 사용자 입력에 대해 안전한 가정을 할 수 있는 더 안전한 코드를 작성할 수 있습니다. 이것은 또한 옵션에서 더 쉽게 선택할 수 있는 기본 설정을 제공함으로써 사용자에게 도움이 됩니다. 이에 대한 몇 가지 예를 살펴보겠습니다.
// assume you are developing a website for a coffee shop
// and most people want to get a medium size americano
// knowing this you want to make it easir for people to
// order their coffee with less hustle
function orderCoffee(typeOfCoffee="americano", sizeOfCoffee="medium", numberOfCoffee=1){
    return (numberOfCoffee + " " + sizeOfCoffee + " size " + typeOfCoffee + " is being prepared. ");
}
console.log("Default order:");
console.log(orderCoffee());
// this way, when an average customer orders online,
// it will be much easier for them to order their daily coffee
// so much so that they will be able to order it with a single button
// alternatively people can also customize their coffee
// by changing the inputs
console.log("Custom order:");
console.log(orderCoffee("latte", "large", 2));
console.log("Another custom order:");
console.log(orderCoffee("macchiato", "small", 1));
// it is also possible to change only part of the inputs
// and leverage the default parameters
// for the rest of the input fields
console.log("Partially customized order:");
console.log(orderCoffee("iced coffee"));
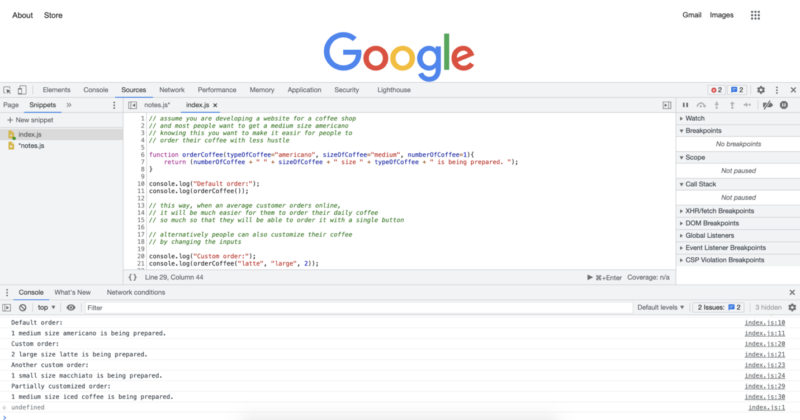
위의 코드를 실행하면 다음과 같은 결과가 나옵니다.
JavaScript의 Date 객체
JavaScript의 Date 객체는 특히 웹 개발에서 매우 일반적으로 사용됩니다. Date 개체를 사용하여 디스플레이 설정을 어두운 모드, 밝은 모드 또는 사용자가 선호하는 다른 모드로 변경하는 것과 같이 시간에 민감한 기능을 수행할 수 있습니다. 우리가 작업 중인 프로젝트 내에서 필요에 따라 날짜 정보를 사용할 수도 있습니다. 다음은 작동 중인 Date 개체의 몇 가지 예입니다.
// the first step is to create a date object instance
// we cna do this by writing the following and
// setting it to a variable or constant of our choice
let today = new Date();
console.log("We are at year: " + today.getFullYear());
console.log("We can also get month in number:");
console.log(today.getMonth());
console.log("Also we can get the hour of the day like this:");
console.log(today.getHours());
console.log("We can also get the exact minutes along with the seconds");
console.log(today.getMinutes());
console.log(today.getSeconds());
// once we have these numbers we can use them as we like
// if we want we can display them or make decisions based on them.
// if we want to display month with a name
// rather than a number, we can also achieve that
// with the following
const months = ["January", "February", "March", "April", "May", "June", "July", "August", "September", "October", "November", "December"];
console.log("We are at the month of " + months[today.getMonth()]);
// what we just did was to create an array to store month names
// and then choose the correct month using an index value
// provided by the .getMonth() method.
// if we wanted to turn on dark mode after 8 pm,
// we could do that with the following code
// one of the first thing we should remember is that
// hours are given in the 24 hour format
// that means 8pm will mean 20 as hours
// we can also use a short hand way
// and combine the new date object creation
// with the get hours method
let timeOfDay = new Date().getHours();
if (timeOfDay >= 20) {
    console.log("Turning on Dark Mode...");
} else {
    console.log("Do not turn on the Dark Mode");
}
// since current time is over 8pm,
// in this case we expect to get turn on Dark Mode.
// which is also the reuslt we get as we can see from
// the console output.
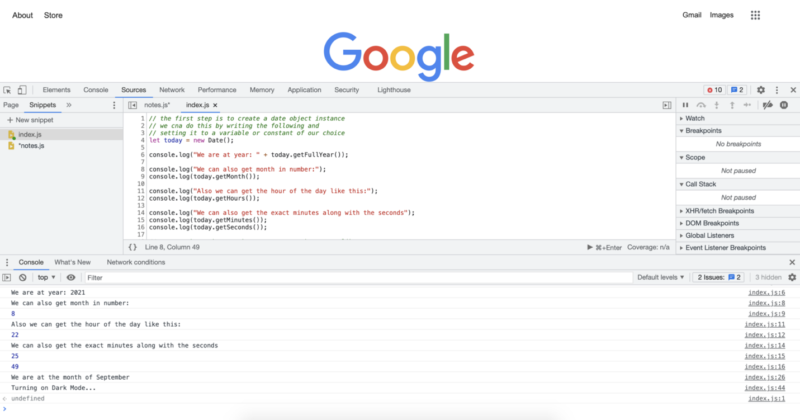
위의 코드를 실행하면 다음과 같은 콘솔 로그가 표시됩니다.
Map() 메서드
map 방법은 많은 코드 줄을 절약할 수 있는 매우 유용한 방법이며 사용 방법에 따라 코드를 훨씬 더 깔끔하게 만들 수 있습니다. 본질적으로 for 루프를 사용하여 배열을 반복하는 데 사용하는 것을 대체합니다. 다음은 map() 메서드에 대한 몇 가지 예입니다.
// lets create an array we will use for mapping
let someNumbers = [1, 2, 3, 4, 5];
// lets also create the functions we will
// provide to the map method
function doubleNums(num1){
    return num1 * 2;
}
function squareNums(num1){
    return num1 * num1;
}
function add100(num1){
    return num1 + 100;
}
console.log("Doubled numbers array:");
console.log(someNumbers.map(doubleNums));
console.log("Squared numbers array:");
console.log(someNumbers.map(squareNums));
console.log("100 added to each of the element in the umbers array:");
console.log(someNumbers.map(add100));
// map() method will loop over each of the
// items in a given array and apply the
// provided function
// note that we do not include paranthesis
// after the function names, this would call the function
// instead we pass the function name,
// and map() method calls them when it needs to
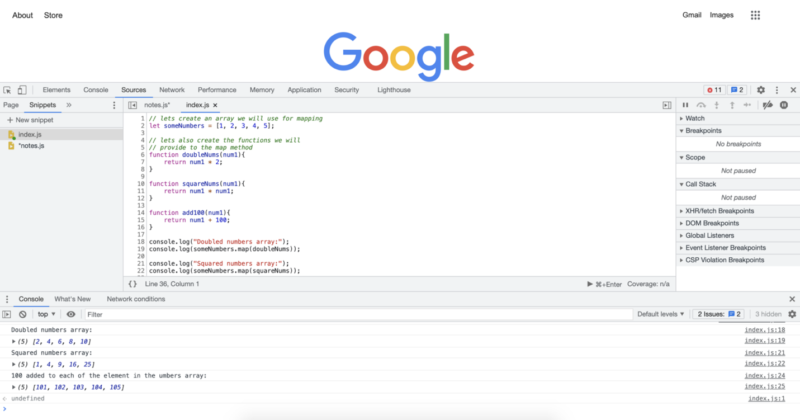
위의 코드를 실행하면 다음과 같은 콘솔 로그가 표시됩니다.

Filter() 메서드
filter() 메서드는 map() 메서드와 함께 매우 일반적인 JavaScript 메서드입니다. 그것들은 우리가 방금 본 map() 메소드와 매우 유사합니다. map() 메서드를 사용하면 모든 함수를 전달할 수 있으며 해당 함수는 배열의 각 요소에 적용됩니다. filter() 메서드를 사용하여 필터 기준을 전달하고 filter 메서드는 배열의 모든 항목을 반복하고 기준을 통과하는 항목만 남아 있는 새 배열을 반환합니다. 이에 대한 몇 가지 예를 살펴보겠습니다.
// lets first create an array
// to apply the filter() method
let someNumbers = [1, 2, 3, 4, 5, 6, 7, 8, 9, 10, 11, 12, 13, 14, 15, 16, 17, 18, 19, 20, 21];
function checkEven(num1){
    if (num1 % 2 == 0){
        return num1;
    }
}
function checkOdd(num1){
    if (num1 % 2 == 1){
        return num1;
    }
}
function over13(num1){
    if (num1 > 13){
        return num1;
    }
}
function divisibleByFive(num){
    if (num % 5 == 0){
        return num;
    }
}
console.log("Even numbers from the list:");
console.log(someNumbers.filter(checkEven));
console.log("Odd numbers from the list:");
console.log(someNumbers.filter(checkOdd));
console.log("Numbers over 13 from the array:");
console.log(someNumbers.filter(over13));
console.log("Numbers divisible by 5 from the array:");
console.log(someNumbers.filter(divisibleByFive));
위의 코드를 실행하면 다음과 같은 콘솔 로그가 표시됩니다. 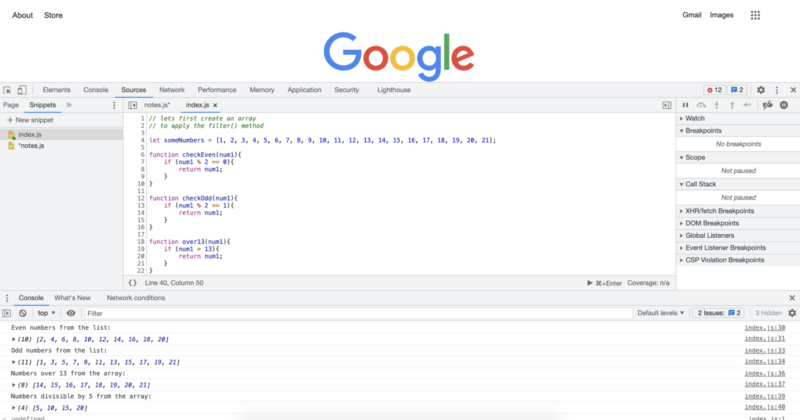
화살표 기능
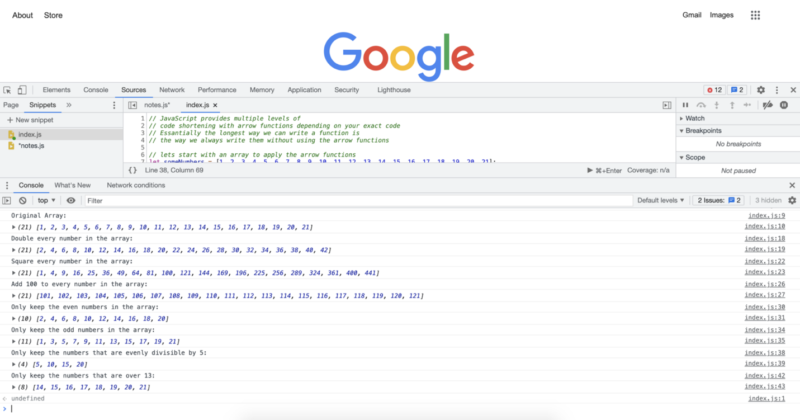
함수는 JavaScript에서 매우 일반적이고 더 성능이 좋거나 깨끗한 코드를 얻기 위해 많은 최적화가 이루어졌다고 말한 것을 기억하십니까? 음, 화살표 기능이 그 중 하나입니다. 화살표 함수는 때때로 뚱뚱한 화살표라고도 합니다. 그들은 본질적으로 함수를 작성하는 훨씬 짧은 방법을 제공합니다. 그들은 또한 우리가 방금 본 JavaScript 메소드와 함께 매우 일반적으로 사용됩니다. 몇 가지 예를 들어 살펴보겠습니다.
// JavaScript provides multiple levels of
// code shortening with arrow functions depending on your exact code
// Essantially the longest way we can write a function is
// the way we always write them without using the arrow functions
// lets start with an array to apply the arrow functions
let someNumbers = [1, 2, 3, 4, 5, 6, 7, 8, 9, 10, 11, 12, 13, 14, 15, 16, 17, 18, 19, 20, 21];
console.log("Original Array:");
console.log(someNumbers);
// in the previous examples we have applied many functions
// after creating them as regular named functions
// In this example we will apply the exact transformations
// so that you can see the both extremes in code lenght
// double every number in the array:
console.log("Double every number in the array:")
console.log(someNumbers.map(num => num * 2));
// square every number in the array:
console.log("Square every number in the array:")
console.log(someNumbers.map(num => num * num));
// add 100 to every number in the array:
console.log("Add 100 to every number in the array:")
console.log(someNumbers.map(num => num + 100));
// Only keep the even numbers in the array:
console.log("Only keep the even numbers in the array:")
console.log(someNumbers.filter(num => num % 2 == 0));
// Only keep the odd numbers in the array:
console.log("Only keep the odd numbers in the array:")
console.log(someNumbers.filter(num => num % 2 == 1));
// Only keep the numbers that are evenly divisible by 5:
console.log("Only keep the numbers that are evenly divisible by 5:")
console.log(someNumbers.filter(num => num % 5 == 0));
// Only keep the numbers that are over 13:
console.log("Only keep the numbers that are over 13:")
console.log(someNumbers.filter(num => num > 13));
위의 코드를 실행하면 다음과 같은 콘솔 로그가 표시됩니다.
다음 튜토리얼에서 우리는 우리가 본 것에 대한 개요를 가지고 다음에 무엇을 볼 것입니다.
저자: 로버트 휘트니
IT 부서를 지도하는 JavaScript 전문가이자 강사입니다. 그의 주요 목표는 코딩하는 동안 다른 사람들에게 효과적으로 협력하는 방법을 가르쳐 팀 생산성을 높이는 것입니다.
10개의 블로그 게시물에서 초급에서 고급까지 JavaScript 과정:
- JavaScript에서 코딩을 시작하는 방법은 무엇입니까?
- 자바스크립트 기본
- JavaScript의 변수 및 다양한 데이터 유형
- 스니펫 및 제어 구조
- while 루프와 for 루프
- 자바 배열
- 자바스크립트 함수
- 자바스크립트 객체
- JavaScript 메서드 등
- 자바스크립트 코스 요약
